
$299.00
ZHIYUN Crane M3S 3-Axis Camera Gimbal Stabilizer Price comparison


- All prices mentioned above are in Canadian dollar.
- This product is available at Amazon.ca.
- At amazon.ca you can purchase Mtanlo Gas Fuel Tank Assembly for MTD MP429 MP479 Craftsman Troy Bilt TB525EC TB590EC Yard Machines 753-06240 Cub Cadet BC5090 CC148 Trimmer with Fuel Lines Replacement Part for only C $33.99
- The lowest price of Mtanlo Gas Fuel Tank Assembly for MTD MP429 MP479 Craftsman Troy Bilt TB525EC TB590EC Yard Machines 753-06240 Cub Cadet BC5090 CC148 Trimmer with Fuel Lines Replacement Part was obtained on August 4, 2025 03:20.
ZHIYUN Crane M3S 3-Axis Camera Gimbal Stabilizer Price History
ZHIYUN Crane M3S 3-Axis Camera Gimbal Stabilizer Description
Discover the ZHIYUN Crane M3S 3-Axis Camera Gimbal Stabilizer
If you’re looking to enhance your photography and videography skills, the ZHIYUN Crane M3S 3-Axis Camera Gimbal Stabilizer is here to elevate your creative projects. Designed for both amateurs and professionals alike, this gimbal offers exceptional stabilization to ensure smooth footage. Experience unmatched control, versatility, and power all in one compact device!
Key Features and Benefits
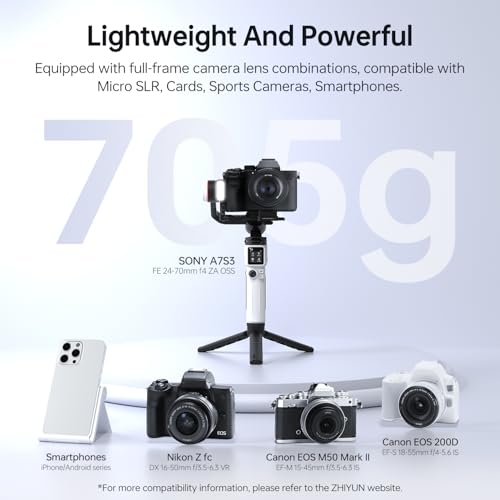
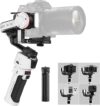
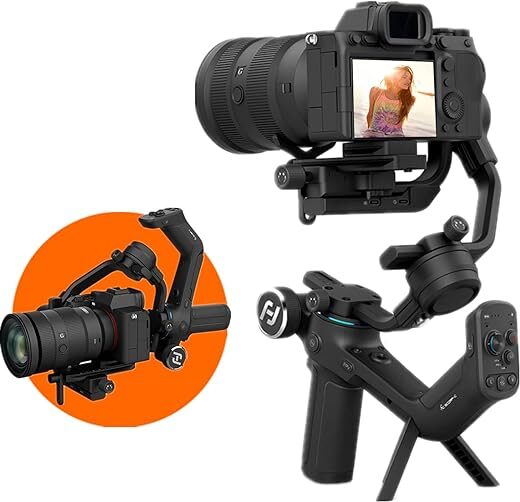
- Compact and Lightweight: With dimensions of 11.19 x 2.93 x 6.44 inches and weighing only 1.55 pounds, the Crane M3S is easy to carry, making it ideal for on-the-go shooting.
- Impressive Stabilization: Equipped with advanced 3-axis stabilization, this gimbal effectively removes shaky movements, allowing for professional-looking videos.
- Maximum Load Capacity: This unit can support equipment weighing up to 705 grams, making it compatible with a wide range of cameras and accessories.
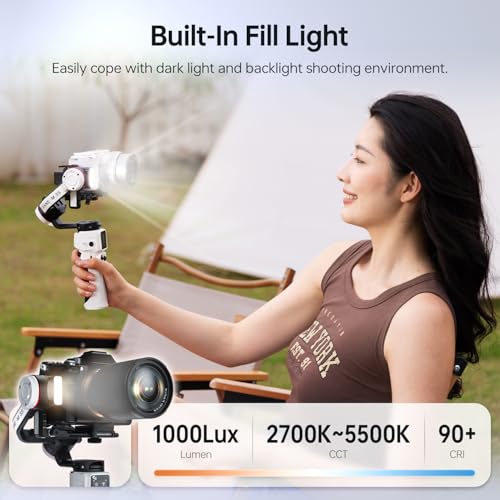
- Battery Life: The integrated Lithium Polymer battery ensures you have enough power for extended shooting sessions, all while being included with your purchase.
- Easy to Use: Featuring an intuitive design, you can set up and operate the gimbal quickly, letting you focus more on your shots and less on complicated equipment.
Competitive Price Comparison
When it comes to price, the ZHIYUN Crane M3S stands competitively against similar camera stabilizers. You can expect to see price variations across several major retailers. By utilizing our price comparison tool, you can find the best deal available, ensuring you get great value for your investment.
Notable Trends from the 6-Month Price History
The price history chart for the Crane M3S indicates a slight fluctuation over the past six months, showing a general trend of stability with occasional discounts. Shoppers can take advantage of these savings, particularly during promotional events, making it an even more appealing choice for those on a budget.
Customer Reviews and Insights
Customer feedback on the ZHIYUN Crane M3S 3-Axis Camera Gimbal Stabilizer highlights its ease of use and remarkable stabilization capabilities. Users praise the gimbal for its lightweight design, which allows them to shoot for extended periods without fatigue. The intuitive interface and multiple modes offer creative flexibility, enhancing their shooting experience.
However, some users have noted a learning curve for accessing all features effectively. While most find the setup straightforward, a few suggest consulting the manual to fully utilize advanced options. Overall, the positive reviews significantly outweigh the drawbacks, showcasing a solid choice for creators seeking quality at a competitive price point.
Explore Unboxing and Review Videos
To gain deeper insights into the ZHIYUN Crane M3S, we recommend watching various unboxing and review videos available on platforms like YouTube. These videos provide real-world demonstrations of the gimbal in action, showcasing its capabilities and versatility in different shooting scenarios.
Why Choose the ZHIYUN Crane M3S?
In a market overflowing with gimbal options, the ZHIYUN Crane M3S 3-Axis Camera Gimbal Stabilizer distinguishes itself through its blend of portability, stabilization excellence, and user-friendly features. Whether you’re filming a short vlog or capturing breathtaking landscapes, this gimbal ensures your footage remains smooth and professional-grade.
Don’t miss out on this game-changing tool for filmmakers and photographers. With its competitive price point and positive customer feedback, it’s a wise investment for anyone looking to enhance their visual storytelling.
Compare prices now!
ZHIYUN Crane M3S 3-Axis Camera Gimbal Stabilizer Specification
Specification: ZHIYUN Crane M3S 3-Axis Camera Gimbal Stabilizer
|
ZHIYUN Crane M3S 3-Axis Camera Gimbal Stabilizer Reviews (11)
11 reviews for ZHIYUN Crane M3S 3-Axis Camera Gimbal Stabilizer
Only logged in customers who have purchased this product may leave a review.
M. Crosby –
I initially bought this for my iPhone 13
Pro max with smallrig cage with two handles, top handle and microphone. It is within the weight limits but it would not hold the balance. It would work for a few minutes but as soon as I would walk it would just go all floppy. So being the genius I am I bought $1000 worth of mirrorlesss camera and lenses as well as the small rig cage. It seemed easier to calibrate but I ran into the same issue. I’d be walking and recording and out of the blue the camera would just roll over. It’s not worth the aggravation. I’m 109#¥% jealous of those that say this work for them but I am also suspicious that it doesn’t really work as well as it is advertised and people tend to not want to admit something doesn’t work because they feel like it’s a slight on them. I could be way off base but it just isn’t as stable as I believe if should be.
NickD –
Works perfectly with Canon M50. However no pairing available for the gimbal and camera. Recording must be done manually on the camera.
RAAKESH R –
The media could not be loaded.
Buscaba un gimbal fiable y de calidad para utilizarlo tanto con mi móvil como con mis cámaras e iba a ser el primero que tuviese. Una de las primeras cosas en las que me fijé fue en que fuese compatible con mis cámaras, una Sony A7R3 y también la posibilidad de conectarlo también a mi Canon M200. Sabía que con la Sony no iba a haber problema pero la Canon M200 no está especificada en las compatibilidades y os puedo confirmar que sí que es compatible tanto por BT como por cable.
Finalmente después de investigar y ver características me decidí por el Crane M3s, porque su peso es de 700 gr, es muy portable y compacto, tiene una batería de larga duración, sobre unas 8 horas dependiendo de la carga del equipo y porque además lleva una luz en el propio gimbal que tiene 800lm, super potente y de gran ayuda en situaciones con poca luz. Puedo confirmar que el gimbal es una auténtica pasada con una estabilización increíble.
Os hago un resumen a modo de manual con sus principales características:
Como ya os he dicho el peso del gimbal es de unos 700gr y con unas dimensiones bastante reducidas las cuales lo hacen muy muy portable, no es más alto que una botella de medio litro de agua.
Viene con una zapata de liberación rápida, una característica fundamental para liberar la cámara rápidamente por si tienes que utilizarla para hacer alguna foto, la zapata es pequeña y en la mayoría de las cámaras, (no en la Canon M200), te deja acceso a la batería sin tener que desmontarla por lo que es un punto a favor.
En la parte frontal encontramos 2 botones:
Una rueda negra con una raya roja y un botón negro debajo de ésta que si lo presionamos 2 veces la cámara vuelve a la posición inicial del dispositivo y queda totalmente nivelada de nuevo. Presionando 3 veces se activa el MODO SELFIE, girando la cámara 180º hacia nuestra cara, modo ideal para bloggers.
La rueda negra con una raya roja que esta encima del botón negro, es totalmente configurable, con ella podemos mover el eje roll o podemos configurarla para manejar parámetros de la cámara, siempre que ésta esté conectada al gimbal por cable, como ISO, shuter o apertura.
En el lateral tenemos el botón POWER, donde encendemos y apagamos el gimbal, y descargando la última actualización de la página de Zhiyun también podemos bloquear o desbloquear la pantalla con una pulsación en dicho botón.
En el lado contrario encontramos una tuerca de ¼ de pulgada la cual nos permite conectar un accesorio opcional, como algún tipo de asa, monitor o micrófono. Debajo de esta rosca encontramos otra pequeña rueda que si la pulsamos durante 2 segundos se enciende la luz led que tiene incorporado el gimbal, subiendo o bajando la rueda cambiamos la intensidad de la luz y si volvemos a pulsar brevemente podemos cambiar la temperatura de color de ésta desde cálida a fría. Como ya os comentaba la intensidad total del led es de 800 lm, una potencia increíble que os ayudará muchísimo en escenas con poca luz.
En la parte trasera encontramos la pantalla táctil con todos los menús de configuración y también 2 botones, uno que pone M y el otro debajo de este que lleva una raya roja. El botón M nos permite cambiar de modos rápidamente con una o 2 pulsaciones, si pulsamos una vez cambiaremos entre los modos PF, L y F y con dos pulsaciones rápidas cambiaremos entre los modos POV, V y P
En la pantalla táctil nos encontramos con 4 menús iniciales:
INFO aquí es donde configuraremos el idioma, sólo tenemos 2 opciones, Chino e Inglés, también encontramos información sobre el dispositivo y la opción de restablecer el dispositivo a los valores de fábrica.
BALANCE nos proporciona información de si el equilibrado que hemos hecho está correcto, en el caso de que no sea así nos lo va a decir con 2 colores, naranja nos indica que el motor está en su máxima resistencia y rojo que los motores están sobrecargados y que corren riesgo.
MODE desde este menú también podemos cambiar los modos del gimbal, PAN FOLLOW, LOCK, FOLLOW…
SETTINGS aquí dentro tenemos opciones como autocalibrado, velocidad de los motores, sensibilidad del joystick, personalización de la rueda delantera…, etc.
Hablamos ahora de los modos de estabilización que trae este gimbal.
Consta de 7 modos (estoy haciendo un video sobre esto para ayudar a entenderlo):
(PF) modo de seguimiento horizontal: si intentas mover la cámara de arriba hacia abajo, no se moverá quedando bloqueada en un punto fijo, pero si la movemos de derecha a izquierda y viceversa, a modo de paneo, la cámara girará con el mango. realizando un barrido horizontal.
(L) Modo de bloqueo La cámara siempre apunta a un punto fijo y si movemos el gimbal la cámara no variará de posición e irá acompañando los movimientos que hagamos con el gimbal, ya que los tres ejes están bloqueados.
(F) Modo de seguimiento eje de rotación se bloquea y los motores del eje de inclinación y del eje de paneo siguen el giro del mango, este modo nos seguirá en los movimientos que hacemos. suele ser el modo más utilizado.
(POV) Los tres ejes se mueven al girar el mango
(V) Modo Vortex El eje de inclinación gira 90° hacia arriba y los ejes de inclinación, rotación y paneo se mueven siguiendo el giro del mango, el efecto Vortex proporciona un efecto increíble de movimiento de 360º a nuestros videos.
(GO) Modo Go El eje de rotación se bloquea y los ejes de inclinación y el eje de paneo siguen rápidamente el giro del mango. Este modo es como el modo Follow pero los movimientos son mucho más rápidos por lo que es ideal para deportes o situaciones donde necesitemos más velocidad.
(Portrait) Modo retrato El eje de inclinación gira hacia arriba 90° y el eje de paneo rota 90° en sentido contrario a las agujas del reloj quedando la cámara en formato vertical. Perfecto para grabaciones de videos para Instagram o videos en formato vertical.
Es importante saber también que este gimbal se conecta al teléfono móvil con la aplicación ZY PLAY a través de Bluetooth y con él manejamos todas las configuraciones desde éste.
Otra cosa que me parece que todo el mundo debería saber es, que si estás pensando en comprarte este gimbal para hacer grabaciones con tu teléfono, podrás usarlo como estabilizador pero no podrás controlar ni tener acceso a la cámara de tu móvil ni configurar ningún parámetro desde este porque no funciona, SOLO estabiliza el teléfono, NADA MÁS. Esperemos que la marca implemente estas funciones para el móvil con nuevas actualizaciones porque para mi es un punto negativo no tener esa funcionalidad.
Resumiendo, lo que más me ha gustado:
– El diseño de la empuñadura y los botones es muy cómodo, tiene buen agarre y tanto los botones como el joystick son perfectamente accesibles, pudiendo cambiar fácilmente los modos del gimbal.
– El peso y el tamaño, están en su justa medida.
– La luz led de ayuda para situaciones con poca luz.
– La configuración inicial de puesta en marcha es rápida y sencilla. Se puede configurar más a fondo posteriormente.
– El equilibrarlo es facilísimo, yo nunca lo había hecho y tenía miedo de que fuese complicado pero se hace bastante rápido siguiendo una serie de pasos que mostraré en un video que compartiré en breve. Para equilibrarlo es muy importante desbloquear los motores del gimbal, tenéis que revisar bien que todas las pestañas donde aparece un candado, estén en el lado opuesto a éste, es decir, desbloqueadas ya que son las que bloquean y desbloquean los motores del gimbal. Otra cosa muy importante es quitar la tapa del objetivo y si la vamos a utilizar con cable, colocarlo. Si utilizamos lentes con zoom y variamos la focal una vez equilibrado, habrá que volverlo a equilibrar, ya que el peso de gravedad del conjunto también variará.
– El proceso de equilibrado es increíblemente simple: sin encender el gimbal, ya que podría dañarse, bloqueamos el eje, colocamos la cámara en su lugar y luego desbloqueamos un eje cada vez, equilibrando el peso de la cámara hasta que cada eje quede perfectamente equilibrado.
– El Joystick es muy suave y podemos configurar los movimientos para que reaccione más o menos rápido.
– Los 7 modos de estabilización, incluidos giro, seguimiento de giro, POV y bloqueo, funcionan increíblemente bien. Y la amplia variedad de mossos que tenemos:
(PF) modo de seguimiento horizontal, (L) Modo de bloqueo,(F) Modo de seguimiento, (POV), (V) Modo Vortex, (GO) Modo Go, (Portrait) Modo retrato y Selfie
Que es totalmente compatible con Canon M200.
Lo que no me ha gustado:
– Que solo tengamos la opción de utilizarlo con nuestros teléfonos móviles como estabilizador no pudiendo manejar los parámetros de la cámara del móvil.
– Otra cosa que creo que deberían cambiar es el tornillo que lleva la zapata, es muy incómodo y requiere llevar encima una moneda, un destornillador o similar, no entiendo como no le han puesto un tornillo de mariposa.
C. Huang –
Great compact gimbal for compact camera setup. Only thing I dislike about it is when closing up to store really has to reset all settings so when take out of bag again I need to rebalance. But without rebalance and just lock the axis. The gimbal itself is in the awkward shape not very easy to fit into bags. Defeated its purpose of being portable for travel. I would suggest at vertical axis arm allows additional length adjustment so when fold everything with already balanced settings
Dami –
Getting this to stay balanced is a pain
Terrible design flimsy
Don’t waste your money 💴
Fernando –
El producto tiene muy buena calidad, tiene varias opciones creativas, además si compra uno el combo, trae todo lo que necesitas, además llego rápido
clayton –
I wanted to give an update to my M3S experience after about a year of use.
It dropped my FX3 and 14mm GM the other day. Hard. Onto concrete. Six feet or so. The mechanism for the plate unlock has developed a real hair trigger. Breathe on it and it will let go. I don’t think I will trust it again.
The axis locks are both shot. It is the metal the tabs slot into. They’ve all beveled to a 45 degrees now and the tabs just get pushed out if the axis is moved. Effectively I can only lock the pan axis.
The theme seems to be bad metallurgy and poor attention to tolerances.
I’m not getting rid of it, but I won’t use it for anything but low end bodies and lenses going forward.
I owned the original M3. They made a lot of mistakes and shortcuts on that one. Terrible baseplate. Not quite good enough to carry common payloads. Etc etc.
No Bluetooth to camera.
The S solves every problem. Buy it.
Do not ever buy the original M3. It’s worthless in comparison.
Xamul Vang –
This tripod has surpassed my expectations! It’s works perfectly with my Sony ZV-E10. We’re getting awesome footage of our dancers at our studio. Smooth operation, even from just an amateur videographer. Battery life is long. The only thing that was a challenge was getting it balanced, but that’s the case with nearly every gimbal.
Brian C. –
Purchased this just shy of 1 year. I wanted to make a review once I had plenty of time to test it.
Pros: the l.e.d light is grea! (It ends there)
Cons: the phone mount doesn’t fit modern phones with case’s. Phones are a expensive investment and I for one won’t remove my case on my fragile 1400 dollar phone to risk a drop mounting it on a 300 dollar gimble. I tested the phone mount without a case on a spare phoe I had. It did fit and the phone mount also pushed up my screen protector. I used this gimble one time at a exotic car show in all this time. It balanced my spare phone for about 15 minutes and then just went limp. Powered it off and on and got another 15 minutes until it went limp. Due to that experience I have not used it since. I tried mounting my sony a74 camera and it vibrates so bad you would think your holding a jack hammer and after the vibration stops it goes limp. I tried a sony action camera and it again goes limp. This is my first and last zihyun as it was a 300 dollar desk top dust collector. I decided to leave this review since I’m on here looking for its replacement for a gimble that actually works. Hohem isteady M6 for the win. Do your self a favor. Stay clear, Dji and hohem are the ones to look at.
clayton –
J’ai ce stabilisateur depuis peu de temps. Je l’utilise avec un Sony ZV-1, donc avec ce qui se fait de pratiquement plus léger. Je fais en général mes vidéos en marchant, en extérieur. J’ai donc besoin d’un stabilisateur léger. C’est un des rares à être compatible avec le ZV-1. J’en ai eu un auparavant qui assurait une bonne stabilisation mais que je n’ai jamais réussi à paramétrer pour qu’il commande le départ et l’arrêt de la vidéo ni le zoom.
Le Crane M3S a de bonnes qualité mais quelques petits défauts.
Les défauts :
Je n’ai pas encore réussi à commander le zoom et de toutes façons j’ai l’impression que ce qu’il peut commander c’est seulement le zoom électronique, ce qui ne m’intéresse pas.
Quand on a effectué l’équilibrage il devient impossible de replier complètement un des bras. C’est un peu cloche. C’est mentionné dans toutes les vidéos. Donc soit on remet le bras à zéro et il faut donc le re-régler la fois suivante (pas très difficile) soit on le laisse en l’état et il est assez encombrant. Comme je n’ai pas trop de problème de place j’ai opté pour la deuxième solution.
L’écran tactile est plutôt bien mais il est dimensionné pour des doigts d’enfant. Si l’on a des doigts un peu gros c’est la galère pour sélectionner ce qu’on veut.
Les site de ZHIYUN n’est pas très bien conçu et l’appli à télécharger ainsi que les moyens d’appairer le stabilisateur et l’appareil ne sont pas intuitifs du tout. L’appli a plein de défauts de conception. Le manuel est minimaliste. Il faut regarder des vidéos sur YouTube. Problème banal d’ergonomie.
Si vous avez un Sony ZV-1 ou un équivalent oubliez la connexion par câble USB. Elle n’est possible que si les ports USB de l’APN sont à gauche (vu de dos) car il n’y a aucun espace sur la droite. La connexion Bluetooth marche bien.
La batterie n’est pas remplaçable. Problème courant.
Les qualités :
C’est un des plus légers tout en ayant une charge utile assez importante.
Il l’air plutôt costaud. On verra à l’usage.
Il est compatible avec une assez grande variété d’APN.
Il déclenche bien la marche et l’arrêt de la vidéo.
Il est possible de régler énormément de paramètres pour le mettre à sa main.
La stabilisation est impeccable. On peut paramétrer le type et la vitesse de suivi dans toutes les directions sauf que même la vitesse minimum est à mon avis un peu rapide.
Il a un illuminateur. Je n’en ai pas encore eu besoin mais c’est le genre de truc qui peut se révéler salvateur dans certaines circonstances.
Le réglage des bras pour l’équilibrage est plutôt bien fichu et les repères gradués sont précis (bien meilleurs que sur mon précédent). Donc si on doit utiliser différents APN on peut assez facilement restaurer les réglages pour chacun.
Il a une monture rapide très pratique… sauf qu’elle est spécifique à la marque et pas de type ARCA et donc qu’elle n’est pas compatible avec les accessoires usuels. Mauvais choix. Il doit être possible de bricoler quelque chose au besoin. Le but affiché est de permettre de changer la batterie et/ou la carte SD sans avoir à la déposer. Sur mon ancien stabilisateur c’était un peu galère. Génial, sauf que sur mon petit appareil cette monture rapide recouvre la trappe. Ce ne serait pas très grave si elle n’était pas fixée par une vis ¼’ qui n’a pas d’anneau en D et si la monture ne permettait pas d’en avoir. Il faut donc un tournevis ou une pièce de monnaie. J’ai mis dans la poche de mon sac une pochette avec des rondelles.
Le joystick pour l’orientation de l’APN est très pratique.
Le manche est un peu court pour mes grandes mains. J’ajoute le trépied replié pour avoir une meilleure prise en main et j’y fixe une dragonne par sécurité.
Je n’ai pas encore eu l’occasion de la tester mais la durée de la batterie est très longue.
George W. Mitchell –
Great Product, solid design, beautiful aesthetics